Qt GUI
QtCreator: Qt cross compilation from linux 64 into linux 32, win32, win64 and Mac OS X; upx, usb, dmg, etc
Cross compilation for Windows 64
Usually one of the most popular problems is the assembly of the Windows version of the application originally developed under Linux. An example of a solution to this problem can be found here or in Russian. You need to create a mkspecs configuration, put the Qt files into the appropriate directory and that’s it. Qt compilation is not necessary in this case, you can download the binaries from the official site.
This approach has several disadvantages: 1) QtCreator does not know anything about the installed library; 2) There is no official Qt build for Windows x64. You can solve the first problem somehow. But the second one can be solved via compilation only…
Do not forget to put directly the cross-compiler itself (it is searched in the package manager by the name “mingw”) before cross-compiling. Download the source codes qt-everywhere from the official site. Copy the win32-g ++ folder to win64-x-g ++ in the mkspecs directory of the unpacked archive. Correct the contents of the qmake.conf file. I got the following:
In fact, only the paths were replaced in the specification file.
I executed configure with the following parameters:
./configure -xplatform win64-x-g++ CROSS_COMPILE=x86_64-w64-mingw32- -prefix /usr/local/qt4win64 -no-webkit -no-phonon -no-phonon-backend -no-script -no-scripttools -no-multimedia -no-qt3support -fast -nomake demos -nomake examples -nomake tools -device-option -little-endian -qt-zlib -qt-libpng -qt-libjpeg -openssl-linked -no-fontconfig -no-3dnow -no-ssse3 -continue
I compile a minimal version of Qt without webkit, phonon, multimedia, etc. For a complete list of options, see the command ./configure --help
The package g++-mingw-w64-x86-64 must be installed for such an assembly. It contains x86_64-w64-mingw32-g++ (in the Ubuntu package it should be installed separately).
Next, make && sudo make install. The native system compiler is used at the first stage of compilation. It collects the necessary utilities for Linux, which will be used to build windows-binaries.
I have PE32+ DLLs in my /usr/local/qt4win64/bin after installation. And a few ELF 64-bit LSB executables: qmake, uic, moc, rcc. They will be used in QtCreator!
Do not delete the unpacked directory after installation as it will be used.
Cross compilation for Windows 32
Similar to compilation for Win64. Except that there is an official assembly, and the library itself does not have to be compiled! It is enough to compile qmake, uic, moc, rcc.
configure:
./configure -xplatform win32-x-g++ -prefix /usr/local/qt4win32 CROSS_COMPILE=i686-w64-mingw32- -no-webkit -no-phonon -no-phonon-backend -no-script -no-scripttools -no-multimedia -no-qt3support -fast -nomake demos -nomake examples -nomake tools -device-option -little-endian -qt-zlib -qt-libpng -qt-libjpeg -openssl-linked -no-fontconfig -no-3dnow -no-ssse3 -continue
Cross compilation for Mac OS X
Cross-compilation for Mac OS X is also very similar, except that you will need to compile a compiler. I collected according to this instruction. It took away a full day of time and a bunch of nerves. You will need a working Mac OS X (at least on a virtual machine) with XCode installed to take necessary files from there. Mac OS X is not needed when compiling your Qt applications.
configure:
./configure -xplatform macx-x-g++ -prefix /usr/x86_64-apple-darwin11/usr/Qt CROSS_COMPILE=/usr/x86_64-apple-darwin11/usr/bin/x86_64-apple-darwin11- -no-webkit -no-phonon -no-phonon-backend -no-script -no-scripttools -no-multimedia -no-qt3support -fast -nomake demos -nomake examples -nomake tools -device-option -little-endian -qt-zlib -qt-libpng -qt-libjpeg -openssl-linked -no-fontconfig -no-3dnow -no-ssse3 -continue
Remember that .a-files are not needed for linking with a library in Mac OS X.
Configuring QtCreator
First, you need to add all installed compilers to the list. Tools - Options - Build and run - Tools:

QtCreator normally defines ABI, but it’s better to double-check. You can also notice that the system x64 GCC in Linux can also generate 32-bit applications. However, this does not eliminate the fact that 32-bit versions of libraries are also needed.
You can add Qt profiles after compilers:

The previously collected qmake, uic, moc, rcc will be useful when adding a profile. You need to select a directory with qmake. A yellow icon with an exclamation mark to the left of the profile indicates a warning, but QtCreator can use such a Qt profile. But if the icon is red, then the profile is non-working. This can happen with an incorrect directory structure. Or if you delete the directory in which Qt was compiled.
The following settings need to be done for each created project. You must go to the “Projects” tab (Ctrl+5) when the project is active. Then add a specific Qt profile:

By default, only the Qt system profile is listed in the “Modify Assembly Configuration” list. But there are all Qt profiles in the list of the “Add” button.
You need to check the library-compiler pair in the main assembly settings. So that both of them were from the same operating system.
QtCreator defaults to the build steps “qmake” and “Build”. I manually added the special stages “upx” and “dmgbuild” for my project. The “upx” stage is executed every time you click the “Build project” button. However, if the executable file has not been modified then upx will return an error. It means that the file has already been processed. In the error triggered, the next step will not be called, i.e. the dmg file will only be updated if upx has worked.
“Upx” tool must be installed on the system for the “upx” stage to work. However, even working in Linux-environment upx can compress applications for: linux32/64, win32, macos32/64. Upx-compression is really needed not for all projects; the stage is shown rather for an example.
For the “dmgbuild” stage, I used the make_dmg script. It needs root privileges so you need to add the script to the /etc/sudoers file.
Changes to the project file to use of third-party libraries
My project uses libusb, this is not part of Qt. It was also necessary to include a platform-dependent implementation of the HID. The following lines were added to the project file:
macx {
    INCLUDEPATH += $$PWD/libusbx/
    SOURCES += BootLoader/HIDAPI/mac/hid.c
    LIBS += -framework IOKit -framework CoreFoundation -lusb-1.0
    ICON = AqPicFlash.icns
}

win32: {
    INCLUDEPATH += $$PWD/libusbx/
    LIBS += -lsetupapi -lole32
    SOURCES += BootLoader/HIDAPI/windows/hid.cpp
    RC_FILE = WinIcon.rc
}

win32: !win64-x-g++ {
    LIBS += -L$$PWD/libusbx/ -lusb-1.0-32.dll
}

win64-x-g++ {
    LIBS += -L$$PWD/libusbx/ -lusb-1.0-64.dll
}

unix: !macx {
    CONFIG += link_pkgconfig
    PKGCONFIG += libusb-1.0
    SOURCES += BootLoader/HIDAPI/linux/hid-libusb.c
}
We link to the system libusb on Mac OS X and Linux. On Windows depending on the bit depth we can link to libusb-1.0-32.dll.a or libusb-1.0-64.dll.a. Remember that .a-file can be renamed, but the application will still depend on libusb-1.0.dll. We take parameters for libusb through the system utility pkgconfig in Linux. We include all necessary system libraries and icons in addition to libusb.
It is convenient to distribute the resulting files for different operating systems by directories. You can do it like this:
macx {
    DESTDIR = mac
    OBJECTS_DIR = mac
    MOC_DIR = mac
    UI_DIR = mac
    RCC_DIR = mac
}

unix: !macx {
    DESTDIR = linux
    OBJECTS_DIR = linux
    MOC_DIR = linux
    UI_DIR = linux
    RCC_DIR = linux
}

win32 {
    DESTDIR = windows/release
    OBJECTS_DIR = windows
    MOC_DIR = windows
    UI_DIR = windows
    RCC_DIR = windows
}

win64-x-g++ {
    DESTDIR = win64/release
    OBJECTS_DIR = win64
    MOC_DIR = win64
    UI_DIR = win64
    RCC_DIR = win64
}
The win64-x-g++ target is for win32. But it is the last one in the project file, so it overwrites the settings.
Result
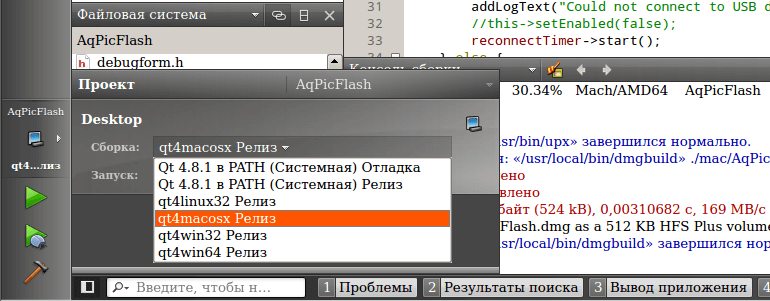
It is enough to choose the type of assembly (as shown in the very first screenshot) and click “Build project” to compile the application for this or that operating system.
Other Articles
ARTICLES
articles linux windows mac os x qt c++
Leave a comment